Phone Photos Through Binoculars
Phone photos through binoculars work: focus the binoculars, hold the phone's main lens at the eyepiece and zoom slightly to remove the dark ring. Full how-to.
In this article
- Quick answer: how to take phone photos through binoculars
- How does taking a photo through binoculars work?
- Step-by-step: getting a sharp photo through binoculars
- Should I use photos or video?
- Which binoculars work best for phone photos?
- Do phone adapters for binoculars help?
- How to keep phone photos through binoculars steady
- What results can you realistically expect?
- Can you use the same technique with spotting scopes?
- Is taking phone photos through binoculars ethical and legal?
- Why are my phone photos through binoculars blurry?
- Can you take phone photos through binoculars if you wear glasses?
- How do you take phone photos through binoculars in low light?
- How should you edit phone photos taken through binoculars?
- Common mistakes
- Worldwide examples: where digibinning shines
- Quick facts
- Sources
- Frequently asked questions
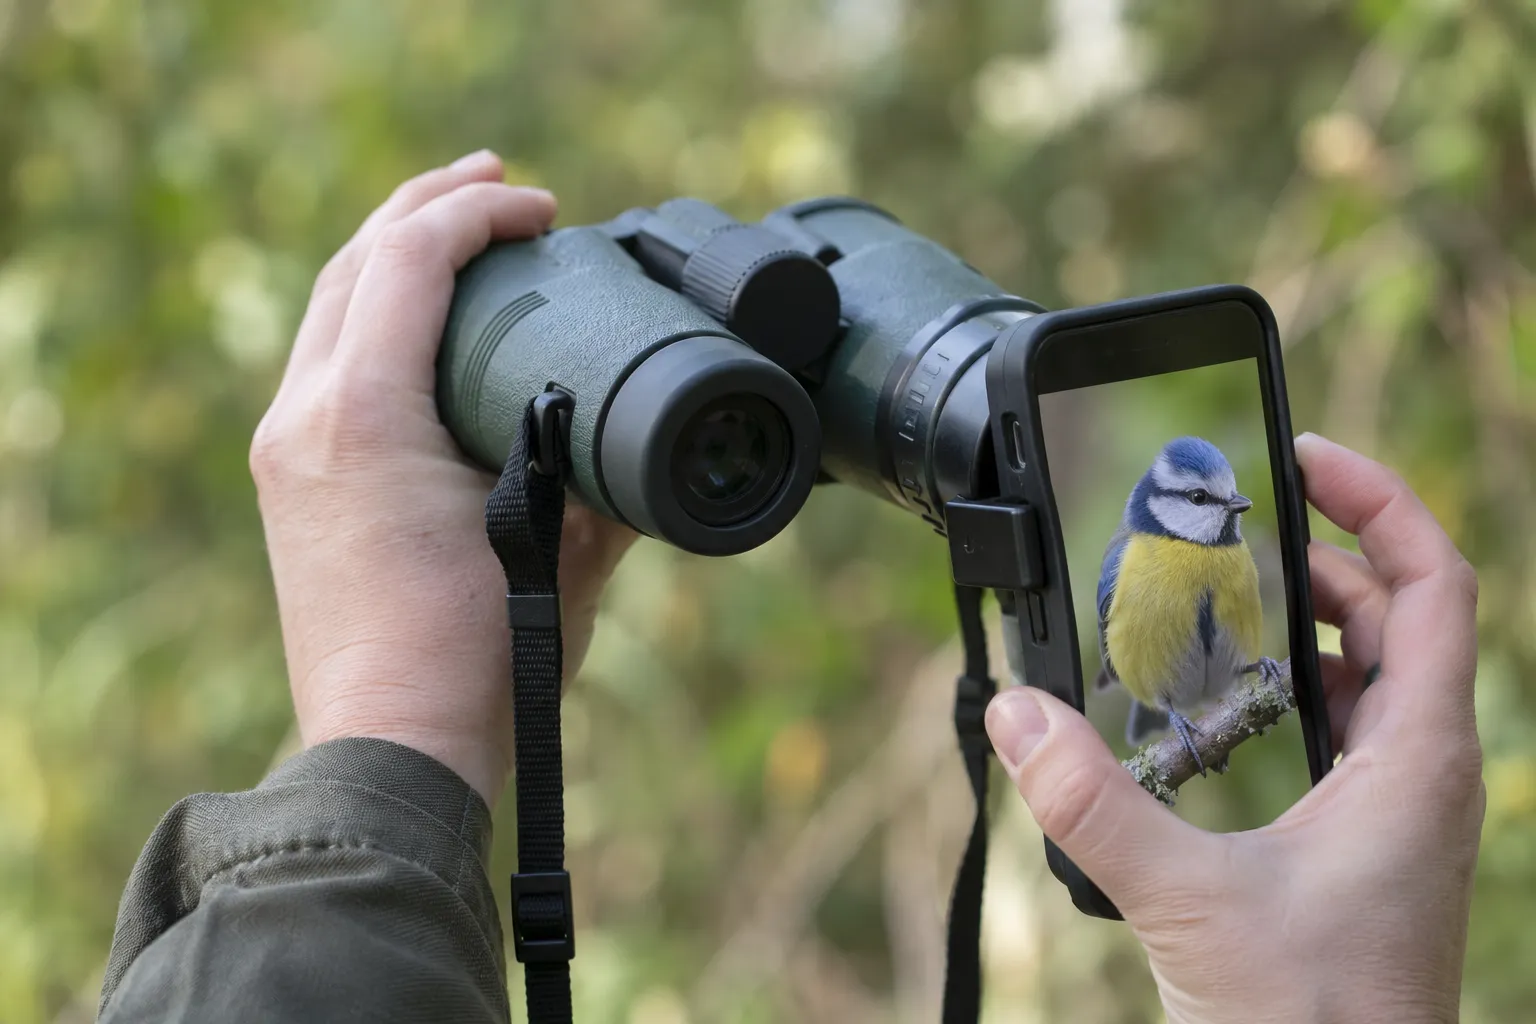
Phone photos through binoculars work well, and the method is simple: focus the binoculars on the bird first, then hold the phone’s main camera lens centered on one eyepiece, close to where your eye would be, and zoom the phone in slightly, to about 2x to 3x, until the dark ring disappears. The binoculars act as a telephoto lens, turning a phone that can barely show a distant bird into one that captures a recognizable, sometimes surprisingly sharp, image.
Birders call this digibinning, a cousin of digiscoping through a spotting scope. It is not a replacement for a camera with a long lens, but it is perfect for documenting a sighting, getting an ID photo to check later, or sharing a bird with friends. This guide explains how it works optically, gives a step-by-step method, and covers settings, adapters and common mistakes.
Quick answer: how to take phone photos through binoculars
- Set the binocular diopter for your eyes and focus sharply on the bird.
- Open the phone camera on the main (1x) lens.
- Hold the phone lens centered on the right eyepiece, a little way back, where your eye would sit.
- Move the phone slightly until the image fills the screen.
- Zoom the phone to about 2x to 3x to remove the dark ring.
- Tap the bird to focus and set exposure, and lower exposure slightly if the bird is washed out.
- Brace everything and shoot a burst, or record video.
How does taking a photo through binoculars work?
Binoculars are designed to deliver a magnified image to your eye. Light from the bird enters the large objective lenses, passes through prisms that make the image upright, and leaves each eyepiece as a narrow beam of light. That beam is the exit pupil, and it is roughly the objective size divided by the magnification. An 8x42 binocular has an exit pupil of about 5.25 mm, and a 10x42 about 4.2 mm. Our guide to what the numbers on binoculars mean explains this in more detail.
Your eye sits at a set distance behind the eyepiece, called eye relief, where that beam is focused into a sharp, full circle. A phone camera works a lot like an eye: a small lens in front of a sensor. If you put the phone’s lens where your eye would be, it records what you would see.
Why the phone lens is small enough to work
Phone camera lenses have small front openings, only a few millimeters across. That is similar to the size of a binocular exit pupil, so a phone lens can capture most of the beam. A large camera lens cannot, which is why this trick works especially well with phones.
Why you get a black ring
Phone main cameras have a wide field of view. Binoculars deliver a round image with a fixed apparent field. The phone’s view is wider than that circle, so you see the round image surrounded by black: vignetting. Moving closer helps, but usually some ring remains until you zoom in a little. Zooming 2x to 3x crops the edges away. Beyond about 3x, digital zoom starts to degrade quality, unless your phone switches to a good telephoto camera.
Step-by-step: getting a sharp photo through binoculars
1. Set up the binoculars for your eyes first
Adjust the interpupillary distance (the hinge) and the diopter so the binoculars are sharp for your eyes. If you skip this, you will struggle to judge focus. Our guide on how to adjust binoculars covers the steps.
2. Find and focus on the bird with your eyes
Locate the bird the normal way, and focus the binoculars carefully on its eye. The phone will mostly use the focus you set on the binoculars, so this is where sharpness starts. If you struggle to find birds quickly, see how to find a bird in your binoculars fast.
3. Prepare the eyecups
Eyecups set how far your eye sits from the eyepiece. For phone photos, try the eyecups fully extended first, resting the phone against them, then try them retracted with the phone slightly closer. Which works better depends on the binocular’s eye relief and the phone. Many people find retracted eyecups allow the phone to get closer and center more easily.
4. Open the camera on the main lens
Choose the standard photo mode on the main 1x camera. Turn off the flash. Some phones swap to a different lens automatically as you zoom, or switch to a close-up macro mode near objects. If the image suddenly jumps or goes soft, check which lens is active. Some phones allow automatic lens switching to be turned off in camera settings.
5. Align the phone lens with the eyepiece
Hold the binoculars steady with one hand, or rest them on something. Bring the phone lens to the right eyepiece. Watch the screen, not the binoculars. Move the phone slowly up, down and sideways until a bright circle of image appears, then center it. Move the phone closer to or farther from the eyepiece until the circle is largest and edges are cleanest.
6. Zoom in slightly
Use the phone’s zoom to crop away the dark ring. Around 2x to 3x usually works. Stop when the ring is gone.
7. Focus and set exposure
Tap the bird on the screen. Most phones then focus and set exposure there. Birds against sky or water are often overexposed, so drag the exposure slider down a little. Many phones let you long-press to lock focus and exposure.
8. Shoot steadily
Press the shutter gently, or better, use the volume button, a timer, voice control or a wireless remote so you do not jerk the phone. Take a burst of several frames. One is often sharper than the rest.
Should I use photos or video?
Video is often the better choice. It captures dozens of frames per second, so even with some shake, a few frames will be sharp. Many phones let you save a still from a video. Video also captures behavior and, sometimes, the bird’s song, which helps with identification.
Photos are better in lower light, since each photo can use a longer exposure and more processing, and they give higher resolution than most video frames.
Which binoculars work best for phone photos?
Almost any decent binocular works. A few features help.
| Feature | Why it helps |
|---|---|
| 8x magnification | Less shake, larger exit pupil, easier alignment |
| Large objectives (42 mm) | Brighter image and a bigger exit pupil to aim at |
| Long eye relief | More room to position the phone, also helpful for glasses wearers |
| Twist-up eyecups | Let you adjust the distance to the phone |
| Good optical quality | Sharpness and contrast carry through to the photo |
| Central tripod socket | Allows tripod mounting for steady shots |
8x42 binoculars are the most forgiving all-round choice. 10x42 models give more reach but demand a steadier hand or a support. Our 8x42 vs 10x42 comparison covers the tradeoffs for birding generally. Compact binoculars with small objectives, such as 8x25 or 10x25, have tiny exit pupils and are hardest to use for phone photos.
Do phone adapters for binoculars help?
Adapters hold the phone in fixed alignment with one eyepiece. Once set, you point and shoot, and you can keep your hands on the binoculars.
Types of adapter
- Universal clamp adapters grip the eyepiece and hold the phone in a spring-loaded cradle. You adjust the phone’s position once to center the lens.
- Phone-case adapters attach to a specific phone case and fit specific eyepieces.
- Simple rubber cups hold the phone at the right distance but do not lock alignment.
When an adapter is worth it
An adapter makes sense if you take phone photos through binoculars often, want steady video, or use a tripod. The downside is setup time: by the time the phone is clamped and aligned, a warbler may have moved on. Many birders carry an adapter for sit-still subjects like owls, waterbirds and raptors, and go handheld for quick documentation shots.
How to keep phone photos through binoculars steady
Shake is the main enemy. It is magnified by the binoculars, and phone cameras lower shutter speeds in dim light.
- Brace your elbows against your chest, a car door, a fence post or a table.
- Rest the binoculars on a railing, a beanbag or a backpack.
- Use a tripod with a binocular adapter if your binoculars have a socket.
- Breathe out and shoot in the pause between breaths.
- Use the phone timer or a remote shutter to avoid tapping the screen.
- Shoot in good light when possible. Bright light lets the phone use faster shutter speeds.
What results can you realistically expect?
Phone photos through binoculars are best for identification and documentation. A bird that fills a meaningful part of the frame, in decent light, can look good enough to share. Distant birds, poor light and heat haze all reduce quality quickly.
Realistic uses include:
- Confirming an identification later, for example with the photo ID feature in bird ID apps. See our guide to the best bird ID apps.
- Documenting a rare or unusual bird for an eBird checklist.
- Recording behavior, such as a nesting bird or a courtship display, from a respectful distance.
- Sharing sightings with family and friends.
Can you use the same technique with spotting scopes?
Yes, and that is where the technique started. Digiscoping, taking photos through a spotting scope with a camera or phone, has been popular with birders since the late 1990s. Scopes offer 20x to 60x magnification, so they reach much farther than binoculars. They also need a tripod, and alignment is more critical because the exit pupil is smaller at high magnification. Everything you learn about digibinning transfers directly.
Is taking phone photos through binoculars ethical and legal?
It is one of the least disturbing ways to photograph birds, because you stay at binocular distance rather than approaching closely. That is a real advantage around nesting birds and roosting owls. Still, the same ethics apply: do not approach birds to get a better phone photo, do not use playback repeatedly to draw them in, and be careful about sharing the exact locations of sensitive species. Our guide to bird photography ethics and birding etiquette cover this.
Why are my phone photos through binoculars blurry?
Blur has a handful of causes, and each has a telltale look. Use this table to diagnose the problem.
| What you see | Likely cause | Fix |
|---|---|---|
| Whole image soft, even when steady | Binoculars not focused, or diopter set wrong | Refocus by eye first, recheck diopter |
| Sharp center, soft or smeared edges | Phone tilted relative to the eyepiece | Hold the phone flat and square |
| Streaky or doubled image | Motion blur from shake | Brace, use a timer or remote, shoot bursts |
| Milky, low-contrast image | Stray light or a dirty eyepiece or phone lens | Clean both lenses, shade the eyepiece with your hand |
| Rippling, wavy detail | Heat haze over roads, water or fields | Shoot early in the day, get closer, pick a cooler angle |
| Image sharp in one frame, soft in the next | Phone refocusing on the eyepiece or background | Tap and lock focus on the bird |
A smudged phone lens is more common than most people think. Phones live in pockets, and fingerprints on that tiny lens can wreck contrast. Wipe it with a soft cloth before every session.
Can you take phone photos through binoculars if you wear glasses?
Yes. You simply take your glasses off for the photo, or leave them on to find and focus the bird and then remove them. Remember that the binocular focus you set with glasses on may differ from the focus that suits the phone. In practice, the phone’s autofocus can usually compensate for small differences, because it is focusing on the virtual image the binoculars produce. If the image looks soft, touch the focus wheel slightly while watching the phone screen, rather than trusting your eye.
Binoculars with long eye relief, which suit glasses wearers, also tend to be easier for phone photos, because the sweet spot sits farther from the eyepiece and is easier to find.
How do you take phone photos through binoculars in low light?
Dawn, dusk and dim woodland are hard. The phone raises ISO and slows the shutter, and every tiny movement becomes blur. Some tactics help:
- Choose your 8x42 or larger binoculars rather than compacts, since larger objectives gather more light.
- Support everything on a tripod or solid rest.
- Use the phone’s night or low-light mode only for sitting birds, since those modes take multi-second captures.
- Accept a small amount of grain rather than a slow shutter speed.
- Consider video and extract the sharpest frame.
How should you edit phone photos taken through binoculars?
A light touch works best. Crop to remove any remaining dark ring and to improve composition. Nudge contrast and clarity up slightly to counter the haze that extra glass adds. Correct white balance if the image looks too warm or cool. Avoid heavy sharpening, which exaggerates noise and makes feathers look brittle. Keep the original file, especially if you might submit it as documentation for a rare bird record.
Common mistakes
- Using the ultra-wide lens. It shows a tiny circle in a black frame. Use the main camera.
- Not focusing the binoculars first. The phone cannot fix a blurry binocular image.
- Holding the phone at an angle. Keep the phone flat and square to the eyepiece.
- Zooming too far. Past about 3x on the main camera, digital zoom destroys detail.
- Leaving exposure on auto against the sky. Birds become dark silhouettes or washed-out blurs. Adjust exposure.
- Jabbing the shutter. Use a remote, the volume button or a timer.
- Giving up after a few tries. Alignment gets fast with practice. Try it on a stationary object, like a street sign or a feeder, before trying it on a bird.
Worldwide examples: where digibinning shines
- Shorebirds and waders on mudflats, from Delaware Bay in the United States to the Wadden Sea in Europe, stay in view long enough to align a phone.
- Waterfowl on lakes and reservoirs across Turkey, Europe and North America.
- Raptors perched on poles or trees along roads.
- Large, slow tropical birds such as toucans and parrots in Brazil, which often perch in the open at a distance.
- Roosting owls that sit still all day, provided you stay well back.
Fast, flitting songbirds in dense cover are the hardest subjects. For those, simply watching and sketching or taking notes may be more rewarding.
Quick facts
- Digibinning means photographing through binoculars with a phone or small camera.
- Use the phone’s main 1x camera, centered on one eyepiece, at the eye-relief distance.
- Zoom 2x to 3x to remove the dark ring (vignetting).
- 8x42 binoculars are the easiest to use; compact binoculars are the hardest.
- Video and burst mode improve the odds of a sharp frame.
- An adapter helps with video and repeated use but slows you down.
Sources
Frequently asked questions
Can you take pictures with your phone through binoculars?
Yes. The technique is often called digibinning, a cousin of digiscoping with a spotting scope. You focus the binoculars on the bird, then hold the phone's main camera lens centered on one eyepiece, at about the distance your eye would be. The binoculars act as a telephoto lens, giving far more reach than the phone alone.
Why is there a black circle around my binocular photos?
The dark ring, called vignetting, appears when the phone lens is not centered on the eyepiece or is too far from it, or when the phone's field of view is wider than the binocular's exit beam. Center the lens, move it closer to the eyepiece, and use a small amount of phone zoom, around 2x to 3x, to crop the ring out.
Are 8x or 10x binoculars better for phone photos?
10x binoculars give more magnification, but they also magnify hand shake and have smaller exit pupils, which makes alignment trickier. 8x binoculars are easier to use handheld and usually give a brighter, more forgiving image. With an adapter and a stable rest, 10x can produce more detailed images of distant birds.
Do I need an adapter to take phone photos through binoculars?
No, but it helps. Handheld shots are possible with practice, especially of birds that sit still. An adapter clamps the phone in alignment with the eyepiece so you only have to aim and focus. It pays off if you do this often or want video, which is hard to keep steady handheld.
Which phone camera lens should I use through binoculars?
Use the main, wide camera, usually labeled 1x. It typically has the largest sensor and aperture. Ultra-wide cameras vignette badly, and phone telephoto lenses can work but often have smaller apertures and narrower light paths. Some phones switch lenses automatically when you zoom, so watch that the image stays on the main camera.